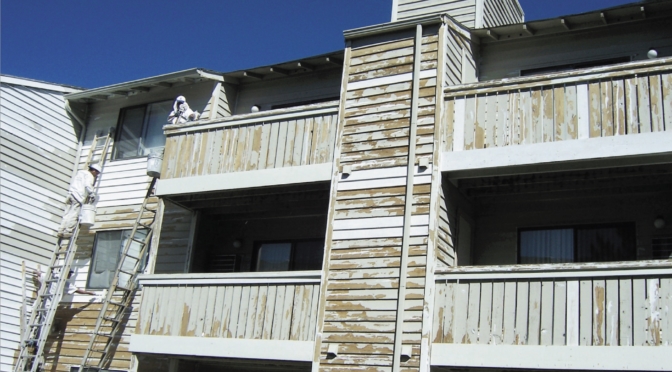
Got an exterior job where the paint is peeling? It’s a common conundrum encountered by professional painting contractors when repainting wood siding. But by arming yourself with the right tools and knowledge, it’s also a problem you can solve.
Peeling happens
To paraphrase the old tune: “Summertime… and the paint is peeling…”
Peeling paint is basically a loss of adhesion to the substrate or, in the case of many older homes, an earlier coating. Where there is a primer and topcoat or multiple coats of paint, peeling may involve some or all of the coats.
Generally speaking, peeling starts when a painted substrate swells, causing the paint film to loosen, crack and fall off.
There are a variety of ways for water to seep under the paint film to cause peeling.
Worn-out caulking (or no caulking) in joints, corners and openings may be allowing moisture to enter. Ice-filled or clogged gutters can cause moisture build-up under the shingles. Leaking roofs or interior moisture migrating through the interior walls might be the culprit. Painting over a dirty, wet or glossy surface can result in peeling, as can painting over a coating that already has marginal adhesion. Perhaps the surface was not properly prepped prior to a previous paint job.
Here are four steps that will help you address peeling paint issues and give your customers a beautiful and long-lasting finish on their wood-sided homes and other properties.
1. Out with the old
First, remove as much paint as possible by scraping, sanding or other appropriate means. Test the coating surrounding any peeled areas out about six to 12 inches to be sure the adhesion is adequate. Recognize that any surface preparation short of total removal of the old coating may compromise the service length of the new system.
WARNING! Removal of old paint by sanding, scraping or other means may generate dust or fumes that contain lead. Exposure to lead dust or fumes may cause brain damage or other adverse health effects, especially in children or pregnant women. Controlling exposure to lead or other hazardous substances requires the use of proper protective equipment, such as a properly fitted respirator (NIOSH approved) and proper containment and cleanup. For more information, call the National Lead Information Center at 1-800-424-LEAD (in US) or contact your local health authority.
2. Prime and caulk
Next, prime the bare surface with the appropriate primer and caulk where necessary – especially at angles and crevices – to eliminate any opportunity for moisture to penetrate into the substrate.
PRO TIP: Exterior Wood Primer is a solid, dependable latex wood primer that dries quickly. See a complete list of exterior primers on the Sherwin-Williams contractor website.
3. Check the condition of the wood
If wood siding is touching the ground, remove that portion of the wood. Siding should come down no further than six inches above the ground. If a wood surface is deteriorated, replace it using cedar, redwood or pressure-treated wood.
Prime the butt ends of the wood before installation to reduce moisture penetration. Follow paint label and data page directions for proper surface preparation and environmental conditions. Be sure the surface is dry prior to painting.
4. Take measures to keep water away
To help prevent future peeling, here’s some good advice to offer your customers: Clean and repair gutters so they properly channel water away from the house. Install vents, louvers, fans and dehumidifiers to relieve moisture, especially in kitchens, bathrooms and laundry areas. Siding wedges can be installed to allow the moisture to escape between the boards instead of through them.
PRO TIP: Once the surface is ready to paint, choosing an appropriate high-quality topcoat product is key to the success of your project. For expert recommendations, see our story Get it Right the First Time: How to Choose the Best Paint and Coatings for All Your Exterior Projects.
Final thoughts
The coatings you apply over the old wood and coatings are only as good as the existing substrate. Painting over gray, deteriorated wood will eventually result in peeling. Without the total removal of the existing coatings or even substrates, you will always have to play catch-up.
This article was published in the Summer 2023 issue of PPC magazine. ©2023 Randall Reilly. Get more answers to frequently-asked painting questions in the PPC magazine archive.

