
All painting projects aren’t the same, so the type of painter’s tape you should use as well as how you prep for painting will vary from job to job, room to room, and surface to surface. We sat down with the Application Engineering Team in 3M’s Construction & Home Improvement Markets Division to compile this pro painter’s guide to taping.
The basics
From textured ceilings to accent walls and decorative finishes to brick, great masking is the key to sharp, professional paint lines and a clean finished look. It will also help avoid rework by preventing paint drips and spatters, and by covering hinges and trim.
Using painter’s tape is a good way to ensure your results are stellar. A great paint job begins with knowing which tape to use, how to mask properly, and how to remove the tape.
Follow these five steps to make sure you do it right.
1. Get the right tape
Most pro painters try to settle in on one or two “go-to” painter’s tapes for the vast majority of their jobs. And sometimes they try to make those tapes work in situations that just aren’t in the cards. While standardizing on a few tapes has benefits, carrying a roll or two of “special” tapes might make all the difference in a touchy job.
2. Prep the surface so the tape sticks properly
Wash the walls and trim using lukewarm water and TSP (trisodium phosphate) or any product recommended for cleaning walls prior to painting.
Rinse with a slightly damp sponge. Make sure you let the surfaces dry.
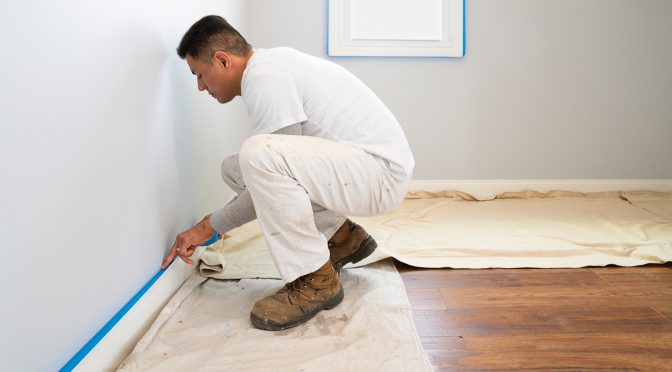
3. Apply tape to all the areas you need to keep paint-free
This includes trim, baseboards, windows, tiles, etc. Pull tape off the roll two to three feet at a time. Apply it on to the surface and into any depressions, laying each new piece of tape over the end of the previous piece.
Or you can unwind a length of tape without cutting or tearing it off the roll and apply it to the surface and into any depressions. Then, unwind more from the roll and work your way across the trim. In either case, press down on the tape as you go. Don’t stretch the tape, as that can cause it to lift or break.
4. Seal the edges
Secure the tape by pressing the edge down with a putty knife, 5-in-1 tool, a rubber squeegee, an old credit card or your finger.
If the wall surface is textured, seal the edge of the tape with the existing base color of the wall. This will help prevent the new paint color from seeping under the tape.
If you’re working with a hard- to-stick-to coating like a zero VOC paint, a dark color or highly scrubbable paint, press the tape down along its entire length a couple of times to ensure that it sticks well.
5. Remove the tape
When the last coat has been applied, carefully remove the tape. This helps prevent paint from bridging over the tape and peeling when you remove it.
When latex paint begins to dry, it becomes rubbery and has a tendency to pull or stretch, which could mess up the crisp lines of the masking and defeat the purpose of the tape.
Remove the tape slowly at a 45-degree angle. Then pull the tape back on itself.
If adhesive sticks to the surface, try pulling the tape off at a 90-degree angle.
If paint is pulling up with the tape, try scoring the edge of the tape with a razor blade before pulling further.
If the tape tears or slivers on removal, there are several possible causes:
- The tape was left on too long. Instead, check to see when the paint is just tacky and then remove the tape.
- The tape removal rate or angle may be wrong. Remember to remove the tape slowly and at a 45-degree angle.
Related stories
Photo courtesy 3M. Sherwin-Williams is a single-source supplier for everything you need for all your projects. There are more than 4,300 locations in North America. Find the store nearest you