
Maximize caulk efficiency and performance with these tips.
“It’s just caulk.”
It’s a common expression among many painters and their crews, but that doesn’t make it accurate. There’s a reason there are so many varieties of caulk on the shelves.
All joints experience some type of movement in their lifetimes, whether it’s due to structural settling or thermal expansion or contraction. Caulk is a key component in delivering long-lasting protection for the work you’re doing on those joints, and picking the right caulk can mean the difference between a satisfied customer and a costly callback a few months later.
Follow these three tips to maximize caulk efficiency and performance on your crew’s projects.
Finding the Right Caulk
When you choose paint, you consider the specifics of the job: whether the surface is interior or exterior, whether to use oil-based or water-based paint, what kind of finish quality is needed, and more. After all, choosing the wrong paint could lead to failure, no matter how good that paint is. You need to choose the product that’s right for the situation.
Your process with caulk should be no different. Choose the caulk or sealant that best suits the job’s setting and needs.
While most of those differences are intuitive, painters should be aware that American Society for Testing and Methods (ASTM) separates caulk and sealants into two major classifications: Class C-834 and Class C-920. C-834 sealants will only expand or contract 1/64 of an inch before cracking. It’s designed for low- to moderate-movement areas, and offers standard adhesion and flexibility. Magnum XL Siliconized Acrylic Latex Adhesive Sealant, one of the top-end C-834s Sherwin-Williams offers, is water- and weather-resistant and can be used on interior and exterior windows, doors, and trim.
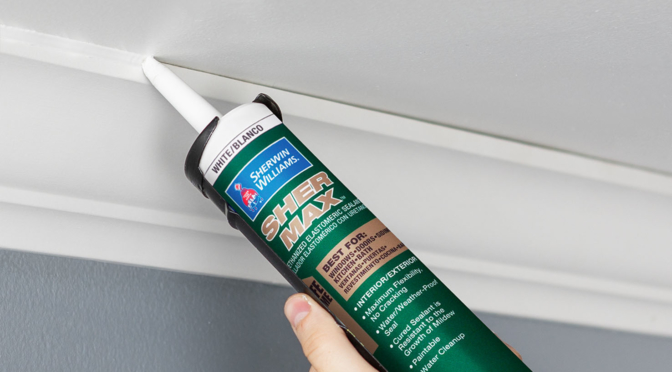
By contrast, C-920 sealants can expand and contract much more. It’s best suited for high-movement areas and dissimilar substrates. The range of expansion/contraction each sealant offers is determined by its class rating. For example, crown molding requires a C-920 sealant with a class rating of at least 12.5, which means the sealant can withstand an increase or decrease of 12.5% of the joint width. The highest-end sealant, SherMax Urethanized Elastomeric Sealant, has a class rating of 35, which allows a level of joint movement roughly akin to ten business cards in thickness.
Another factor to consider when choosing a caulk is regional weather. For example, plasticizers—which are used in many brands of caulk—can allow for mold and mildew buildup in high humidity. For contractors working in the South or other humid regions, consider a plasticizer-free caulk like White Lightning Pristine Premium Acrylic Sealant. Talk to your local Sherwin-Williams store representative to see if there are any considerations you should be aware of in your region.
Choosing a Caulk Gun
Thankfully, there are fewer variables to consider when choosing a caulk gun. Though it’s good to find a gun with an ergonomic grip or drip prevention, the main aspect to consider is thrust ratio.
Thrust ratio essentially measures how many pounds of force will be exerted on the tube piston from a single squeeze of the trigger. In practice, a higher thrust ratio means that painters will experience less forearm fatigue, because it takes less physical effort for the same results.
A low-end caulk gun may only offer a 2:1 ratio (two pounds of push from one squeeze), which may get the job done but will leave your crew exhausted. Most painters who regularly caulk should consider upgrading to a gun with at least a 12:1 thrust ratio. Premium guns offer even better ratios. The ETS 3000 Dripless Caulk Gun offers an 18:1 thrust ratio plus composite materials that make it 40% lighter than competing guns, allowing your painting team to caulk longer with less fatigue.
Caulking Like a Pro
Once you have your caulk and gun selected, all that’s left is the application. Application is largely as simple as you think: place the nozzle in the joint, slowly squeeze the trigger, and draw the nozzle along the joint. If you’ve chosen your products well, you will likely encounter few problems, though consider these additional tips for best results.
- Before starting, brush out the joint that you’re sealing, in order to give your caulk bead a clean start.
- Cut the nozzle small to start. You can always go back and cut it deeper later if need be.
- Once caulking is complete, make sure to tool the joint—your finger or a rag will do just fine. While you will get some caulk on your finger, be careful that it’s not too much. If you’re wiping out half as much as you put in the joint or more, you’re overfilling the joint with too much caulk. This won’t affect the caulk’s ability to adhere, but it means you’re wasting material and making a mess.
- Not every joint is appropriate for caulking! Never caulk joints more than half an inch deep, more than half an inch wide, or less than an eighth of an inch wide. Doing so will likely result in adhesion failure, regardless of the caulk brand you’ve chosen.
Conclusion
Avoid the temptation to treat caulk like an afterthought. While the difference between tubes at the store may seem negligible now, a callback months from now due to caulk failure will cost you much more in the long run.
Instead, take the time to find the right caulk for the job, choose a gun that keeps your team fresh all day, and impress customers with your quality finish.